Starting from Glacier Lodge, the five of us hiked about 3.5 miles on the main South Fork Big Pine Creek Trail before turning right (north) on a signed, but unmaintained, trail heading towards Willow Lake. As is common with use trails, this one gets vague-to-non-existent in a few places. Never saw Willow Lake. We easily crossed two minor creeks, which are known to be much more difficult to cross earlier in the year. The use trail eventually leads up the west side of a canyon, north of Willow Lake. When confronted with a marshy area thick with willows, we moved to the east side of the creek in the canyon and onto a ducked route through talus boulders. We crossed back to the west side of the creek once we reached the beginning of the drainage below Elinore Lake. We ran across another use trail following the left side of the creek that drains Elinore Lake. To avoid the willow patches, stay on the left side of the creek. As you near the lake, go farther left away from the creek and find a rocky slope up against a cliff that is willow-free. The hike in to Elinore Lake went well and we were at the lake by mid-afternoon.
Once at Elinore Lake, I walked around it looking for campsites, but could find only two established campsite areas. Both were somewhat hidden on tree-covered low ridges just east of the lake. The best and largest campsite was the most eastern one of the two sites, and was the higher of the two. During the afternoon Jim caught a number of trout in the lake, quite large ones too. It appears fishermen seldom visit the lake. Jim and Louise had so much fish to fry that night that they shared their catch with Steve, Samantha and I.
We started hiking at 6:30 am, heading south for the gap in the ridge that leads up to Scimitar Pass. The gap in the ridge is the same one shown in R.J. Secor's guidebook (2nd ed.) leading from the lake to Scimitar Pass. Once we were on the south side of the gap, we headed up staying near the ridge. One notable section of annoyingly loose moraine rubble was encountered partway up. Above this loose section, the rock gets a little less steep and more stable, allowing one to choose between hiking over the glacier (as Steve did), or hike on top of the ridge leading to Scimitar Pass (as the rest of us did). The snow on the glacier had already softened somewhat, so Steve made good time following the north edge of the glacier without crampons.
|
We regrouped at the Pass, and then started our ridge-run south along Palisade Crest. Exposed class 3 climbing is soon encountered when we were forced up on top of the knife-edge ridge. This part of the route was relatively easy to follow, had solid rock, and was quite fun.
Click any photo for a larger image. |
The group at Scimitar Pass; from left to right, Steve, Jim, Louise, and Samantha.
|
On the knife-edge ridge.
|
Another view of the knife-edge ridge traverse.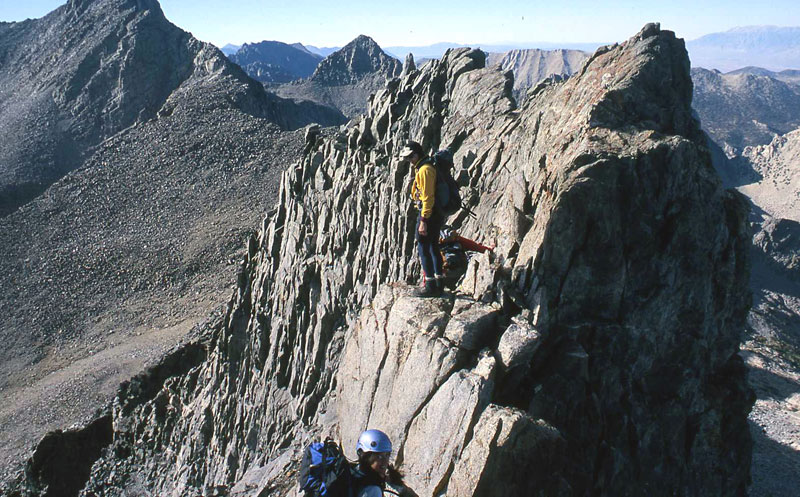
|
| After the knife-edge traverse, we dropped down on the right (west) side of the ridge and picked our way across narrow ledges, leading around a corner where someone's cleared bivy site can be easily spotted. This is followed by passing through a somewhat awkward class 3 slot that slants up and to the left and is open at the top. This slot is actually right back on the ridge crest itself, because the route on other side of the slot is now obviously on the left side of the crest for the first time since Scimitar Pass. |
Daryn below the up-and-left slanting rock slot. Gandolf Peak can be seen through the slot. Photo by Samantha Olson.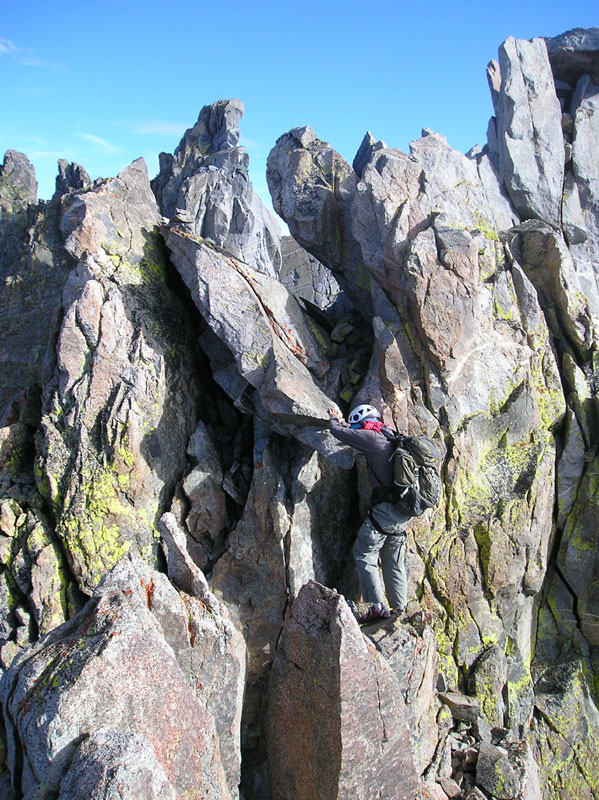
|
Passing through this slot leads to the next section of the climb that results not only in an increase in route finding difficulties, but also an increase in climbing difficulty. Climbers have been defeated by the exposure and route finding problems on this part of the climb. After dropping down several feet from the slot, one is tempted to continue contouring across the east face of the ridge, as we did at first. However, a too-wide gap in the rock is soon encountered, showing this to be incorrect route. The correct route is to almost immediately drop down about 15-20 feet after passing through the slot, then contour across a broken series of ledges another 20 feet or so until one can start climbing back up to the main ridge crest. This down-across-up traverse will not look particularly appealing because the initial short descent near the slot is near-vertical over very narrow scree-covered ledges. The exposure is enormous. Samantha and I carefully downclimbed this section while the others quickly and easily rapped down to a nice ledge, meeting us at the end of the 20-foot traverse section. We then all climbed back up towards the main ridge crest.
The following description is not exactly how we eventually reached the base of the summit, but rather is a description of the easiest way there we were able to find (through no small degree of trial-and-error...mostly error).
The next goal looming near us was an obvious rock pinnacle sitting just below the main ridge crest. There is also a minor green lichen covered ridge that leads down behind the pinnacle and towards the glacier below. Going around this green lichen-covered ridge rather than going over it was, for us, the key for getting to the summit. So, starting from the pinnacle, squeeze through a narrow gap just to the right of the pinnacle and downclimb towards some nice flat rocks to the south that lie directly on the main ridge crest. This downclimb and traverse has considerable exposure to the west, but it gets you past the green lichen-covered ridge.
Near the beginning of this flat rock section, step up a few feet to the east onto a higher rock and peer over the eastern edge of the ridge. The next move is a short friction down climb over a highly angled smooth rock. This short friction move probably goes class 4 and doesn't appear to lead anywhere at first. However, continue down a narrow sloping ledge on the north side of the friction slab, bypassing a funny looking bush with pointy stems or leaves. I mention this bush because I don't recall seeing anything else like it during the climb. Anyway, this sloping ledge system leads to the south side of the green lichen ridge (but there is no green lichen on this side of it). Continue downclimbing near the ridge until you can start down towards the south (towards the peak) downclimbing a series of flakes and narrow ledges into the other side of a wide, but short, gully. The gully has a large, distinct rock cairn at its base.
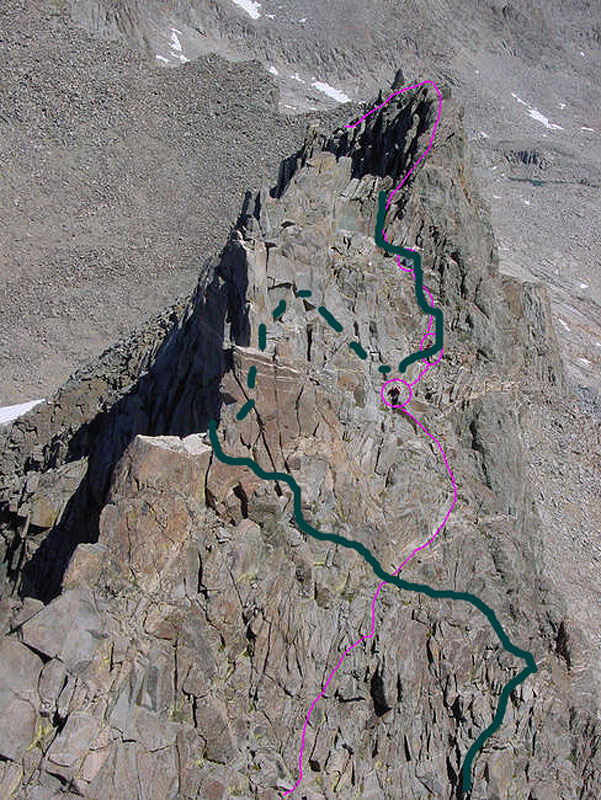
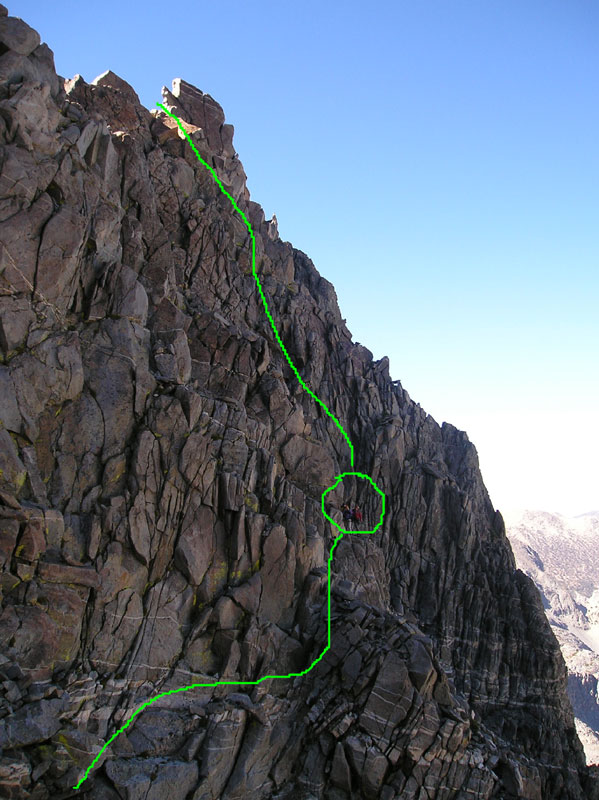
| In this picture taken by Bob Burd in 2004 from the top of the class 4 wall, our approximate climbing route is shown in green. At the far end, the line starts at the slanted rock slot described earlier, goes up and behind the green lichen-covered ridge (indicated by a dashed line), and drops down again over the class 4 friction slab just below the main crest. Photo modified and reprinted with permission from Bob Burd. | Another view of the route from below the class 4 wall. The green line crosses over the class 4 friction slab at the very top of this photo. Circled are Steve, Louise and Jim contemplating their next move. Photo by Samantha Olson. |
|
|
This downclimb in the gully was the most challenging part of the climb for me, as my perception of the difficulty was apparently skewed due to downclimbing this steep section first before actually climbing up it. Steve took the lead here and proceeded to down-climb over the broken series of flakes and narrow ledges down into the gully without too much trouble. I followed and found the difficulty to be probably no more than class 3, but certainly the most difficult class 3 section of this climb. Down near the big rock cairn at the bottom of short gully, the route was now relatively easy to follow as we contoured over to a chockstone sitting in the huge notch below the class 4 wall.
| In the left corner just below this wall Samantha found an anchor to tie into, so I put on my rock shoes and started up the wall dragging the 60-meter rope. I found a nice crack 1/3 of the way up to wedge in a chock, and then another crack 2/3 of the way up for the smallest cam I was carrying. As other trip reports have indicated, this part of the climb was a cinch compared to the route finding we had just subjected ourselves to. There's a great rock horn for an anchor at the top of the wall in the right-hand (west) corner. I belayed Samantha up next using the 60 meter rope, and she then set up a belay station at the opposite end (east side) of the wall to help bring the others up. The 48 meter rope was long enough to belay people up from Samantha's position, but as we found out, certainly not long enough to belay people from where I sat at the other end of the wall. |
Samantha belaying climbers up the class 4 wall. Gandolf's wizard hat, the high point of Palisade Crest, is behind her.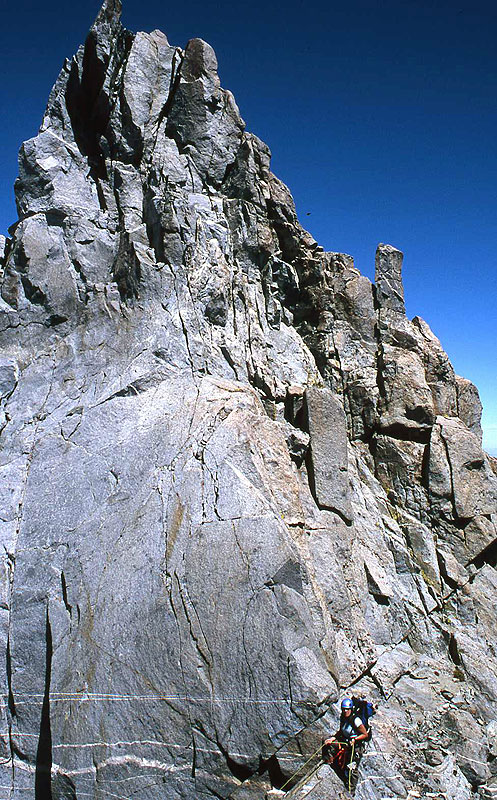
|
| Although the wall is solid, climbers sent an occasional fusillade of small rocks down the wall into other climbers waiting there turn to come up. Thus, the recommendation for bringing a helmet. I belayed Steve up the wall, the last one up, while others made the 100 foot climb up the final pinnacle. Samantha called the pinnacle Gandolf's wizard hat, a very fitting name. As I was belaying Steve up, the excess rope slid down into a crack that I thought was shallow, but ended up being bottomless. Naturally, the rope got stuck in the crack when I tried to pull it out. Steve came over and tried for 10 minutes to pull the loop of rope out, but to no avail. So I reluctantly pulled out my pocket knife and Steve cut the stuck loop of rope in two places. |
Steve reaching into the bowels of the rock trying to pull out the stuck rope. An embarrassed Daryn looks on helplessly. Photo by Samantha Olson.
|
| With the rope we had left, it appeared there was now not enough to do a double rope-rap down the wall. Regardless, Louise expertly tied the now 3 pieces of rope together with double fisherman knots while Steve and I headed up to the summit. Not too surprisingly, the register can was empty. Many Sierra summit registers have been vandalized over the past 5-6 years. I had an extra register book down in my daypack left with the rope below, so we went back down to get the book, had everyone sign the new book, then I took it back up to the summit to deposit into the canister. |
Louise on the summit of Palisade Crest. Photo by Samantha Olson.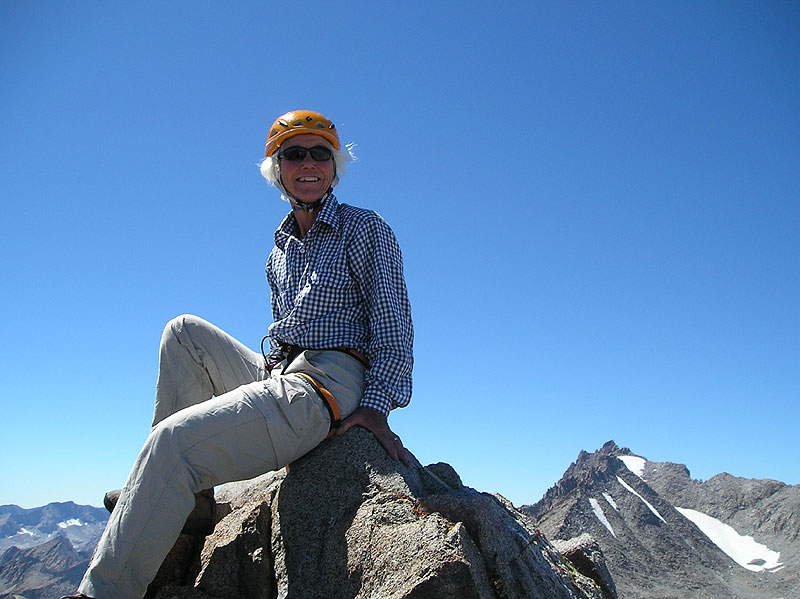
|
| By the time I was down from the summit for the second time, Steve and Louise had solved the embarrassing mess I created. The resulting tied rope was indeed not long enough for a double rope rap from the rock horn at the west end of the slab. However, Steve found a nice crack about 6 feet up at the east end of the slab, where Samantha was belaying climbers up, and threw a sling over it. At this end of the slab, the rope was now just long enough for a double rope rap to the bottom of the slab. The only hitch was we had to remove our rappel device to get past the knot tied in the rope about 2/3 of the way down. This turned out to be not a problem, as there was a nice ledge to stand in while getting past the knot. |
Jim rapping off the class 4 wall, with Samantha and Daryn still at the top waiting for their turn. Photo by Steve Eckert.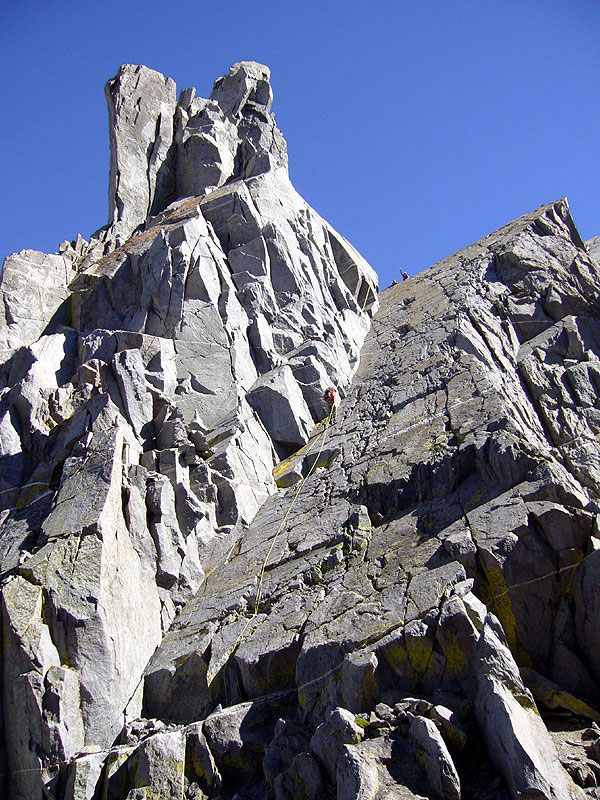
|
We retraced our route back towards the south side of the green lichen covered ridge (again, the lichen is actually on the other side of this ridge). Steve made his way to a notch in the ridge, and found he could step across a narrow chimney on the other side. This is the approximate alternate route shown in Bob Burd's photo above. However, this move was followed by a more difficult class 4-5 move, which he protected by throwing a sling over a rock horn above him. The rest of us went up to the main ridge. A quick hip belay for a couple climbers got everyone safely over the friction slab just below the main ridgecrest. After which we put the rope away for good. Backtracking back to Scimitar Pass from here was considerably easier on the way out.
At Scimitar Pass once again, Steve gathered up his backpack and headed west to meet up with a climbing group led by Jeff Fisher near Barrett Lakes. They planned to climb Starlight Peak tomorrow. The rest of us headed back to Elinore Lake, getting there about 45 minutes after dark.
Before we hiked back to the cars the next morning, we celebrated Louise's 66th birthday with a big wooden match stuck in a granola bar, courtesy of Samantha. We had to sing the Happy Birthday song rather quickly because the match flared up like a Roman candle and burned out in less than 15 seconds!